


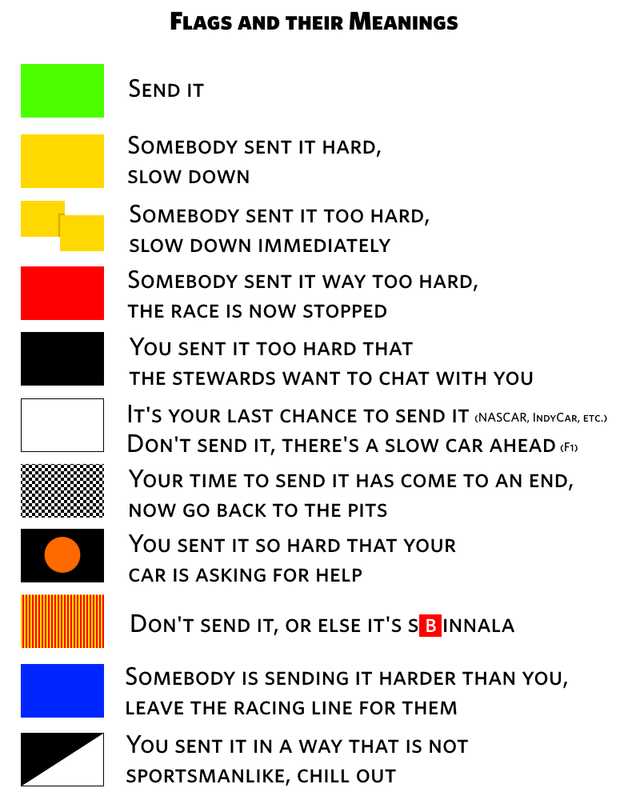
So, the other day I was messing around with my racing stuff, and I got to thinking about those NASCAR flags. You know, the ones they wave around during the races. I decided to make my own, just for fun. I started with the green one, ’cause that’s the most important, right? It means “go,” like, let’s get this race started!
First, I needed something to use as a flag. I found an old green bedsheet in my closet. It was the perfect shade of green, like, that bright, vibrant green you see on the track. I cut out a big rectangle from the sheet. It wasn’t perfect, but hey, it’s just for me, right? Then, I had to find a stick to attach it to. I went out to my backyard and found a sturdy branch that had fallen off one of my trees. I cleaned it up, took the leaves off and trimmed it down to a good size. It was a bit rough, but I sanded it down a bit to make it smoother. Nothing fancy, just enough so I wouldn’t get splinters. I’m no carpenter, but it worked. If i had the tools, I think it would have been better, but who cares? I’m not a professional, so I just used what I had.
Next, I had to attach the flag to the stick. I grabbed my trusty old stapler and got to work. I folded the edge of the flag over the stick and stapled it a bunch of times. It wasn’t the prettiest thing, but it held. I waved it around a few times to make sure it was secure, and it seemed pretty solid. Good enough for a homemade flag.
I also wanted to make a checkered flag, ’cause that’s the one that means the race is over. I did the same thing as before. This time I found an old white t-shirt in the donation bag, and I cut out a rectangle from that. I didn’t have any black fabric, so I just used a black marker to draw the squares. It took a while, and my hand got a little tired, but I think it turned out okay. Then I used some black tape to make it look better. The white part was white enough, just like the green flag, I stapled it to another stick I found in the yard.
Here’s what I did step-by-step:
- Find materials: I found an old green bedsheet, a white t-shirt, a couple of sturdy branches, a stapler, and a black marker.
- Cut the flags: I cut out rectangles from the green bedsheet and the white t-shirt. They were roughly the same size, but I didn’t measure or anything.
- Prepare the sticks: I cleaned up the branches, removed the leaves, and trimmed them to a good length. Then I sanded them down a little to get rid of the rough edges.
- Draw the checkered pattern: I drew black squares on the white fabric with a marker. Then I used black tape to make the squares and make them look a bit better. It wasn’t perfect, but it looked like a checkered flag, more or less.
- Attach the flags to the sticks: I folded the edge of each flag over a stick and stapled it several times. I made sure they were secure by waving them around.
So yeah, that’s how I made my own NASCAR flags. They’re not perfect, but they were fun to make. Now I can wave them around when I’m watching the races. Maybe I’ll make the other flags sometime, too. Who knows? It’s just a fun little project to keep me busy.


