


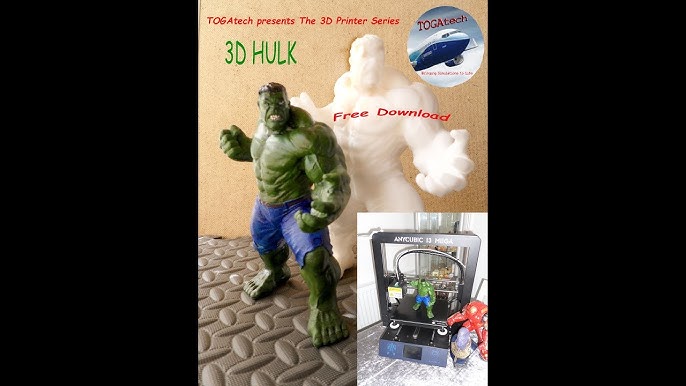
Okay, so, the other day I got this crazy idea to 3D print something cool, and what’s cooler than the Hulk, right? I mean, the dude’s a classic.
First things first, I needed to find a good 3D model of the Hulk. Not just any Hulk, though. I wanted one that looked like he was about to smash something, you know, the classic angry Hulk. So, I started digging around the internet, checking out all these different sites that have 3D models.
It took a while, but I finally stumbled upon this awesome model. It was perfect! This Hulk model looked like he was ready to jump off the screen, muscles bulging, teeth gritted, the whole nine yards. I downloaded the STL file, which, if you’re not into 3D printing, is basically the file format that 3D printers understand.

Next, I had to get this file ready for my printer. I use this software, a slicer, you might know it, it’s pretty common. It’s like a translator for 3D printers. It takes the model and slices it into a bunch of layers that the printer can understand and print one by one. I loaded the Hulk STL into it, and started messing around with the settings.
Now, this part can get a little tricky. You gotta make sure you get the settings just right. Things like the layer height, the infill density, supports, you name it. It all affects how the final print turns out. I went with a pretty standard setup, nothing too fancy. Just enough to make sure the Hulk would come out looking solid and detailed.
Once I had all the settings dialed in, I generated the G-code, which is like the actual instructions for the printer. I loaded that onto an SD card, popped it into my printer, and hit print. Then came the waiting game.
- Check the 3D printer: Make sure that the 3D printer is properly connected and ready for printing.
- Load the filament: Load the green filament into the 3D printer.
- Start printing: Start the printing process on the 3D printer.
It took a good few hours, but man, was it worth it. Seeing the Hulk slowly take shape, layer by layer, was pretty darn cool. When it was finally done, I carefully removed it from the print bed, and there he was, in all his green glory.
I had to do a little bit of cleanup, you know, removing the supports and stuff. But once that was done, I was left with this amazing 3D printed Hulk. He’s sitting on my desk right now, looking like he’s about to go on a rampage. It’s a great conversation starter, and honestly, it just makes me happy to look at him.
So yeah, that’s the story of how I 3D printed the Hulk. It was a fun little project, and it’s definitely got me thinking about what else I can print. Maybe I’ll try printing a whole Avengers team next. Who knows? The possibilities are pretty much endless.
Tips
- Choose a good model: Take your time to select the appropriate 3D model for your project.
- Adjust printer settings: Make sure to optimize the printer settings for the model.
- Be patient: 3D printing takes time, so be patient and enjoy the process.
- Post-processing: After printing, some post-processing may be needed.
Anyway, that’s all for now. Hope you enjoyed my little 3D printing adventure!


